Have you ever rage-quit an app, muttering "Who designed this thing?" under your breath?
In fact, users abandon 88% of applications after their first interaction.
The difference between a digital product that users can't live without and one they delete in seconds isn’t about fancy features or trendy looks. It all comes down to a thoughtful product design process —one that truly understands and prioritizes human needs.
In this guide, you'll learn how to conduct effective user research, define problems worth solving, generate innovative ideas, build and test prototypes, and ultimately deliver exceptional digital experiences.
At Greensighter, we've refined this process through years of helping startups transform their product ideas into market successes. See how we helped a gen AI app increase user retention by 37% →
Now, let's explore what product design actually means in the digital world.
What is Product Design?
Before diving into the process itself, let's clarify what product design actually means in the digital world.
Digital product design is the systematic approach to creating and improving software products that solve specific user problems while meeting business objectives.
It encompasses the entire journey of conceptualizing, creating, testing, and refining digital experiences—from the initial spark of an idea to the fully realized product in users' hands.
But wait—isn't that just UX design? Not quite.
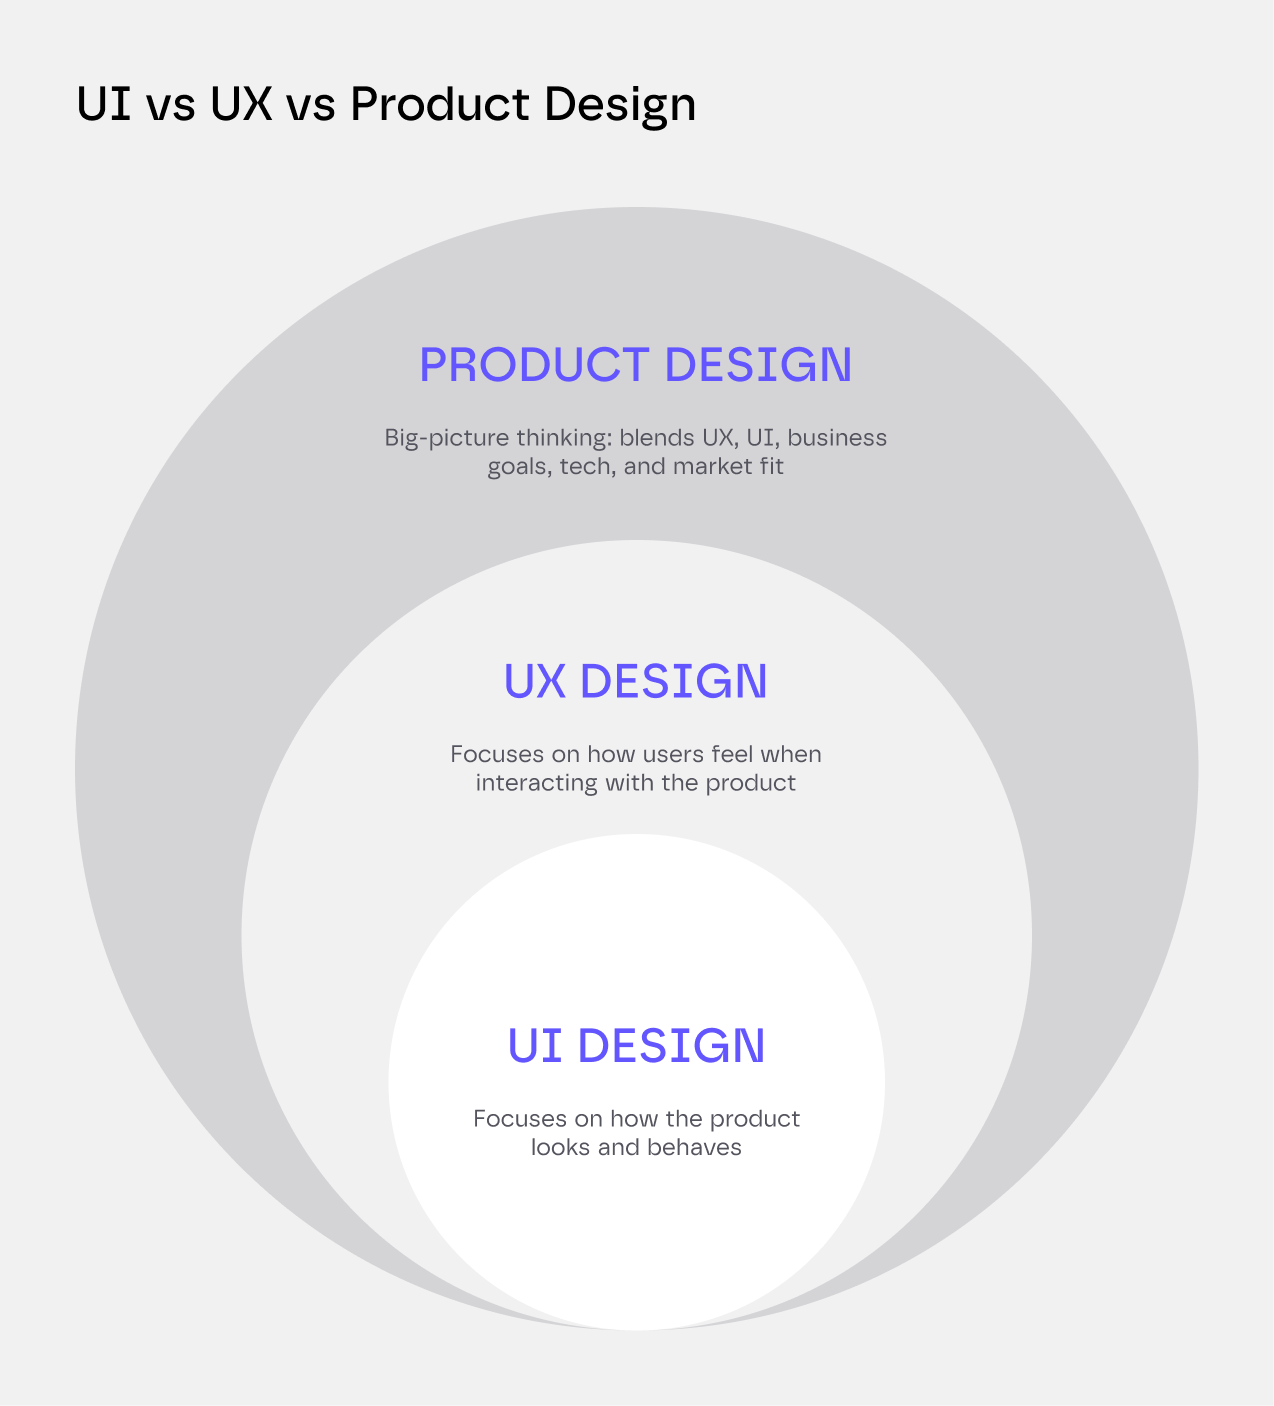
While product design, UX design, and UI design are closely related and often overlap, they serve different purposes in the creation process. UX (User Experience) design focuses specifically on how users interact with and experience a product. UI (User Interface) design centers on the visual and interactive elements that users engage with.
Product design, however, takes a broader view. It integrates UX and UI with business strategy, technical feasibility, and market viability.
A product designer doesn't just ask "Is this usable?" but also "Should we build this at all?" and "How does this contribute to our business goals?"
Now that we understand what product design is, let's explore the step-by-step process that brings digital products to life.
The Product Design Process: Step-by-Step
Every successful digital product is the result of a deliberate process. While creative inspiration certainly plays a role, it's the systematic approach to understanding problems and crafting solutions that truly drive results.
Today you’ll discover the design thinking method as it’s proven to be the best for startups and tech companies.
Let's break down this iterative process into clear, actionable steps.
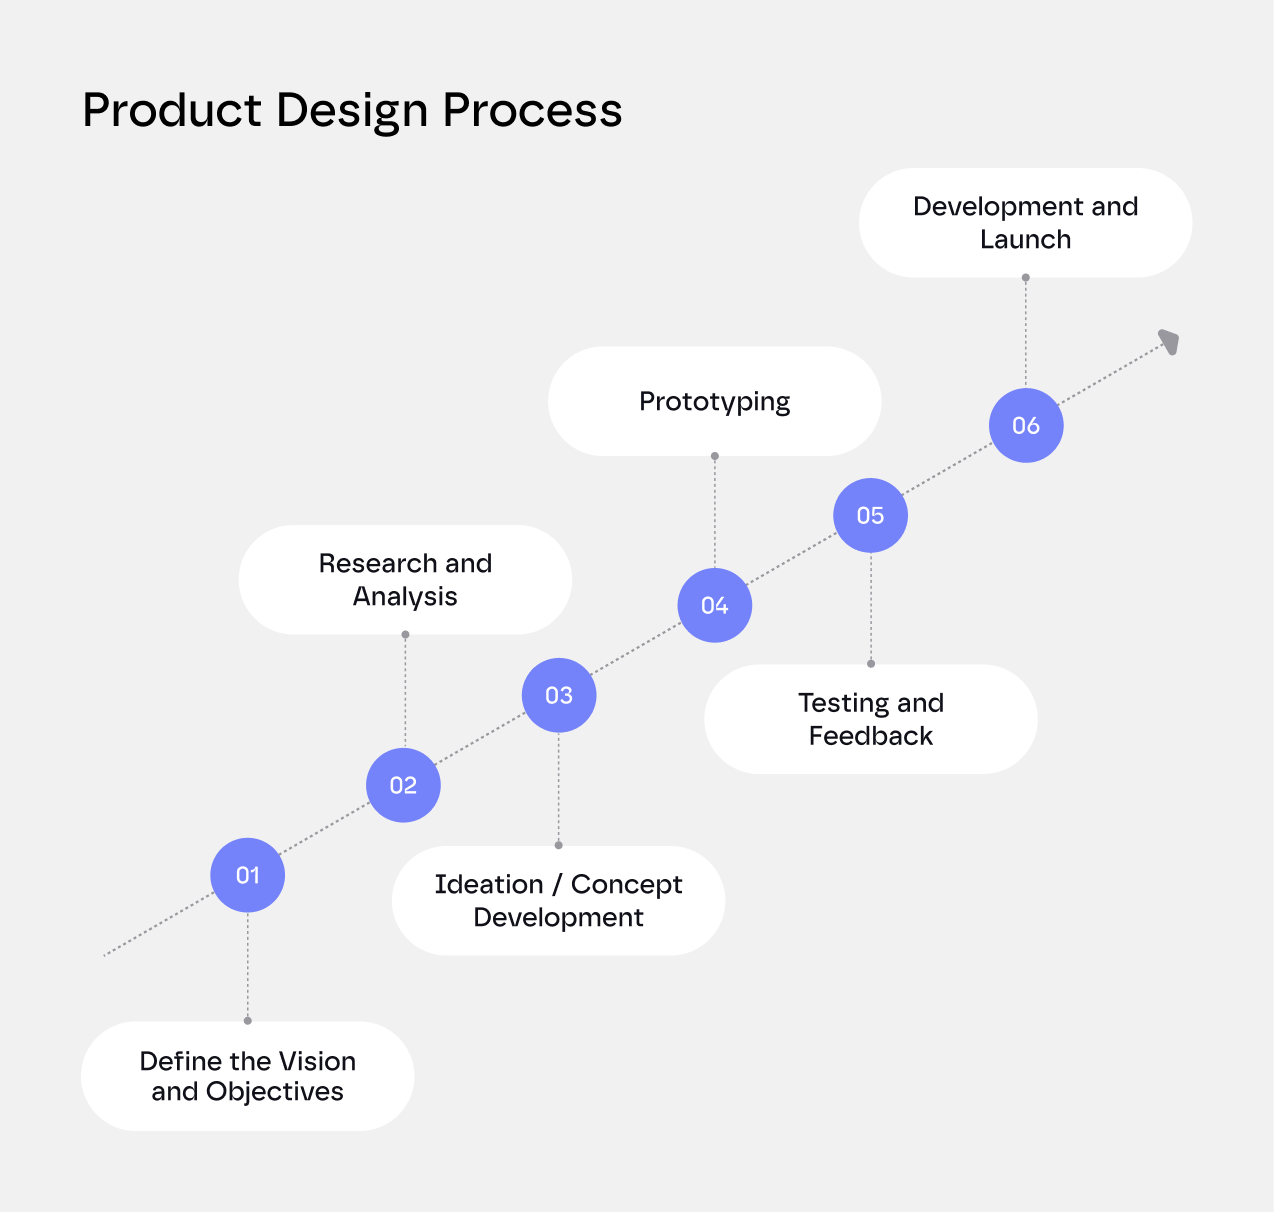
Step 1: Define the Vision and Objectives
The product design process begins long before the first pixel is placed. It starts with clarity—a shared understanding of what you're building and why it matters.
Too many teams jump straight into designing screens without first establishing a solid foundation. This is like building a house without blueprints. You might end up with walls and a roof, but will it serve its purpose? Probably not.
Start by aligning your product goals with broader business objectives. Ask questions like:
- What specific business problem are we solving?
- How will this product contribute to our company's growth?
- What metrics will define the success of this initiative?
- How does this fit into our long-term product roadmap?
The best designs don’t just impress—they deliver real, measurable impact.
Next, identify all stakeholders who will influence or be affected by your product. This typically includes executives, product managers, developers, marketing teams, sales representatives, and of course, end users. Each stakeholder brings unique perspectives and expectations to the table.
With stakeholders identified, document the project scope in a formal brief or product requirements document (PRD). A good PRD covers:
- Product vision and goals
- Target users and their needs
- Key features and functionality
- Success metrics
- Timeline and resources
- Constraints and dependencies
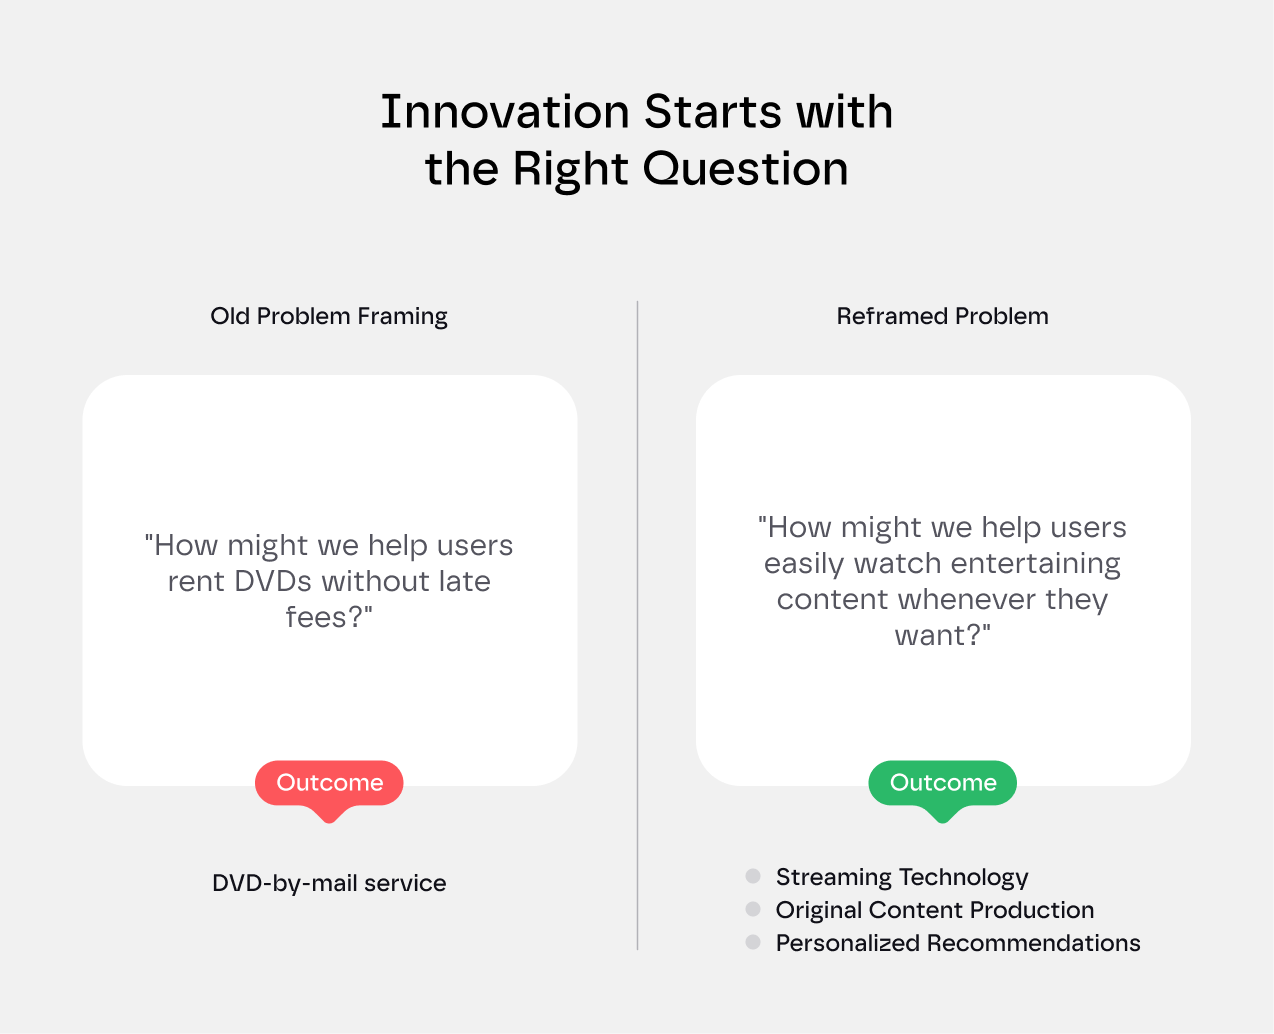
In its early days, Netflix defined its problem narrowly: "How might we help users rent DVDs without late fees?" This led to their DVD-by-mail service.
The breakthrough came when they reframed to: "How might we help users easily watch entertaining content whenever they want?" This subtle shift expanded their thinking beyond physical media, directly sparking their most transformative innovations:
- Streaming technology
- Original content production
- Personalized recommendations
When running your own ideation sessions, try reframing your problem statements. The way you articulate your problem creates boundaries for your solutions.
Shift boundaries, to discover opportunities others miss.
{{cta-blog-component}}
Step 2: Research and Analysis
With a clear vision established, it's time to venture into perhaps the most critical phase of product design: research and analysis. This is where you build the foundation of knowledge that will inform every subsequent decision.
The success of your research hinges on one fundamental principle: we are not our users.
This simple but powerful concept reminds us that our own preferences, behaviors, and assumptions are poor predictors of how actual users will interact with our product. No matter how experienced you are as an entrepreneur or designer, you cannot substitute your judgment for real user insights.
As design legend puts it:
You are not the user. You are not the customer. You are not the client. Your opinion doesn't matter as much as you think it does. Get over it. - Mike Monteiro
So how do we escape our own biases and truly understand our users? Through structured research methods that fall into two main categories:
Quantitative Research: The What and How Many
Quantitative research gives you numerical data about user behavior and preferences. It answers questions like "How many users abandon our checkout process?" or "Which features get used most frequently?"
Key quantitative methods include:
- Surveys: Distribute well-crafted questionnaires to gather feedback from a large number of users. Tools like Google Forms, Typeform, or SurveyMonkey make this accessible even on limited budgets.
- Analytics: Google Analytics, Mixpanel, or Hotjar provide data on how users interact with your existing digital products. Look for patterns in page visits, time spent, conversion rates, and drop-off points.
- A/B testing: Compare two versions of a design element to see which performs better against your success metrics.
While quantitative data tells you what's happening, it doesn't tell you why. That's where qualitative research comes in.
Need to bring clarity on this? Book a meeting with our experts.
Qualitative Research: The Why and How
Qualitative research provides rich, contextual insights into user motivation, feelings, and behaviors. It helps you understand the reasoning behind the numbers.
Essential qualitative methods include:
- User interviews: One-on-one conversations with users about their needs, pain points, and experiences. These provide deep insights but require careful planning to avoid leading questions.
- Observation sessions: Watching users interact with your product or perform relevant tasks in their natural environment reveals behaviors they might not even be conscious of.
- Contextual inquiry: A hybrid approach where you interview users while they work in their own environment, combining direct questioning with observation.
- Card sorting: A technique where users organize information into categories that make sense to them, helping you design intuitive information architecture.
The insights gained during this research phase will directly inform your problem definition and solution ideation. Without this foundation, you risk building a product that solves the wrong problem or addresses it in the wrong way.
As the saying goes…
If I had eight hours to chop down a tree, I'd spend six sharpening my axe.
Step 3: Ideation and Concept Development
After gathering user insights and defining the problem, it's time to generate solutions. Good ideation is a structured process that leads to meaningful concepts.
Creative Ideation Techniques
Three proven techniques stand out for product teams:
- Brainstorming: Set a short time limit (15-30 minutes) and generate as many ideas as possible without judgment. The goal is quantity over quality at first.
- Mind mapping: Start with your core problem and branch out with potential solutions, needs, and opportunities. It's great for seeing unexpected connections between ideas.
- Sketching: Simple thumbnails and wireframes help communicate abstract concepts better than words. No artistic skills are needed.
Running Effective Ideation Workshops
Great ideation happens in collaborative sessions that bring diverse perspectives together. These workshops work best when they begin with research insights displayed as constant reference points for the team. The most productive sessions blend both individual and group activities—starting with quiet solo ideation before moving into group sharing. This approach prevents groupthink while making space for different thinking styles.
Time is your ally in these workshops. Rather than long, draining sessions, break ideation into short, high-energy sprints. When you keep the pace quick and maintain a clear focus, teams stay engaged and ideas flow more naturally.
Pro tip: Make sure to document everything during these sessions. Even ideas that seem impractical at first might spark brilliant solutions later.
One standout method is Crazy Eights—where each person sketches eight ideas in eight minutes. This rapid pace pushes teams past obvious solutions toward more innovative concepts.
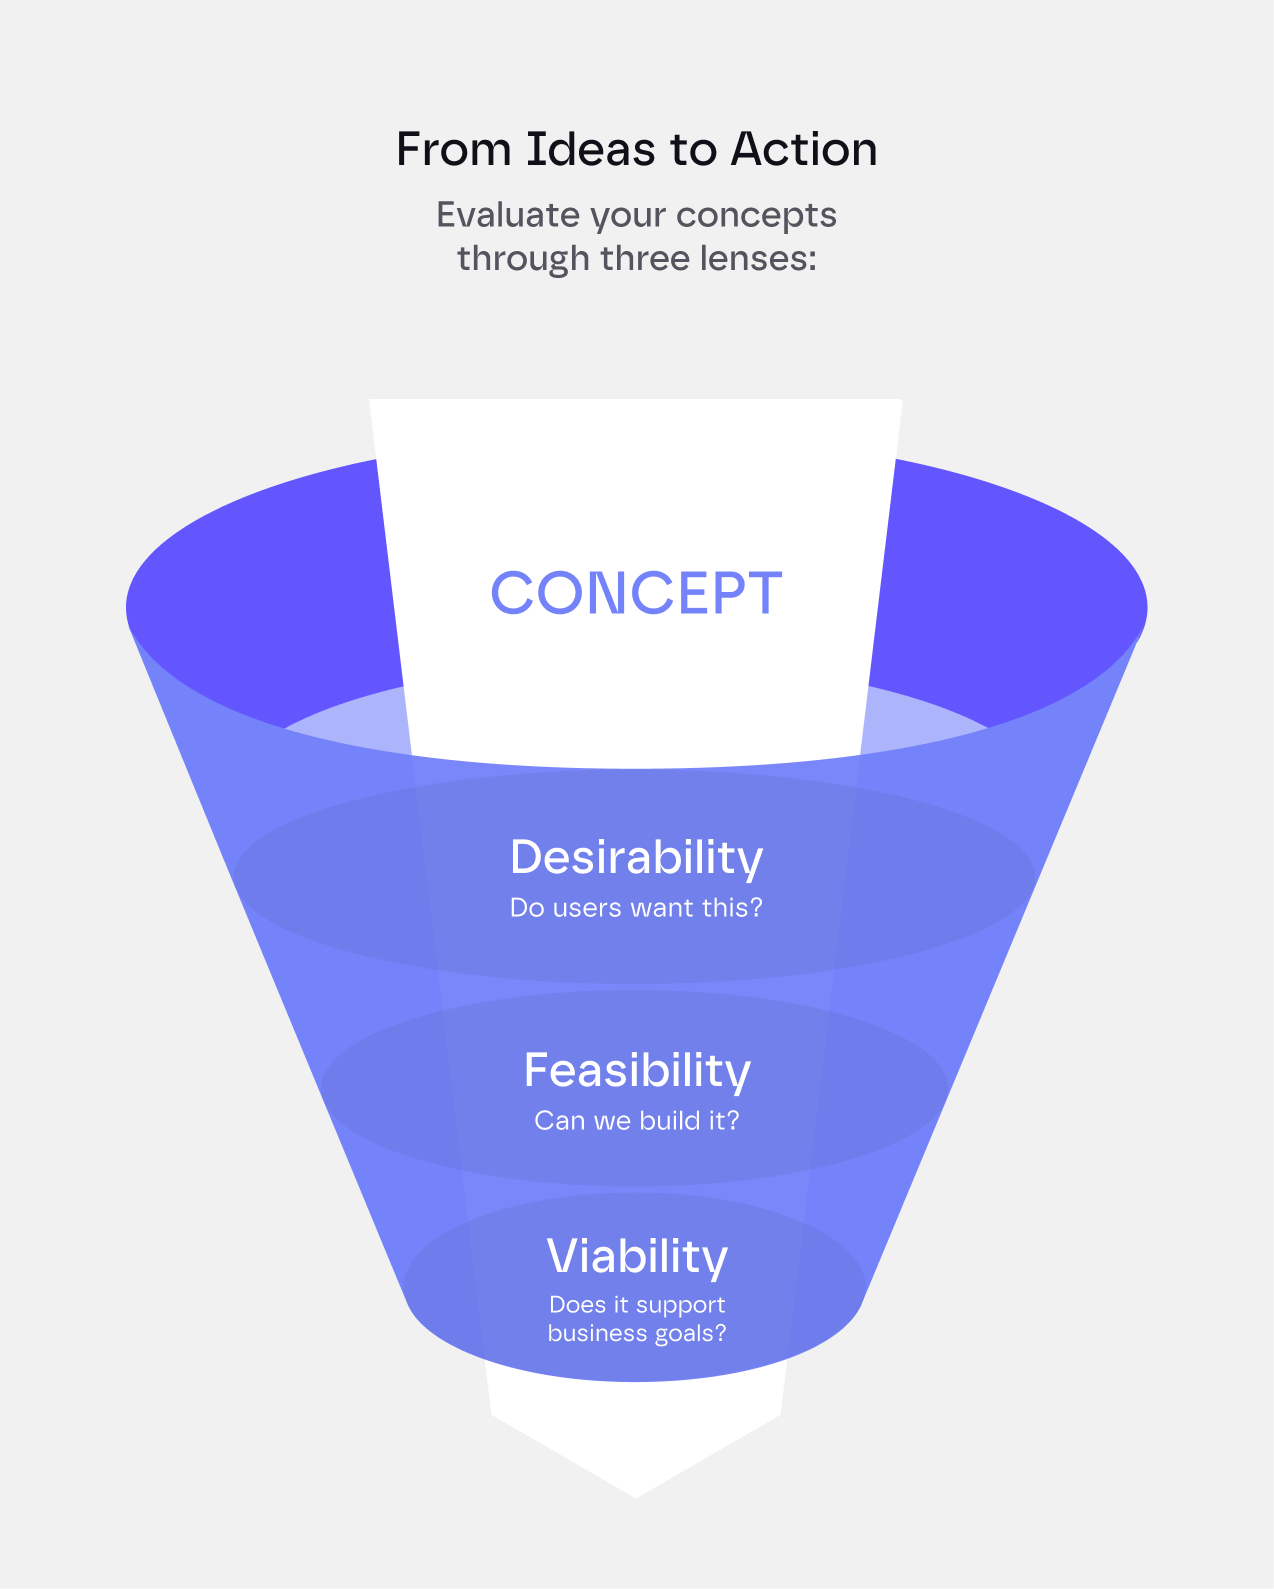
From Ideas to Action
Evaluate your concepts through three lenses:
- Desirability: Do users want this?
- Feasibility: Can we build it?
- Viability: Does it support business goals?
The best ideas score high across all three areas. These become your priority concepts ready for prototyping.
Step 4: Prototyping
Prototyping bridges the gap between ideas and implementation. It's where abstract concepts take shape into something users can interact with.
Prototyping lets you test assumptions before investing heavy development resources.
Understanding Prototype Fidelity
Prototypes range from quick sketches to fully interactive mockups, and choosing the right fidelity level depends on what you need to learn.
Low-fidelity prototypes—like paper sketches and basic wireframes—work best early in the process. They're quick to create and easy to discard if they don't work.
Mid-fidelity prototypes add more detail and basic interactivity through digital wireframes and linked screens. These help when you're ready to test specific workflows and interactions.
High-fidelity prototypes mirror the final product with polished visuals and sophisticated interactions, but save these for later stages when you're refining the experience.
Real-World Prototyping example by Uber
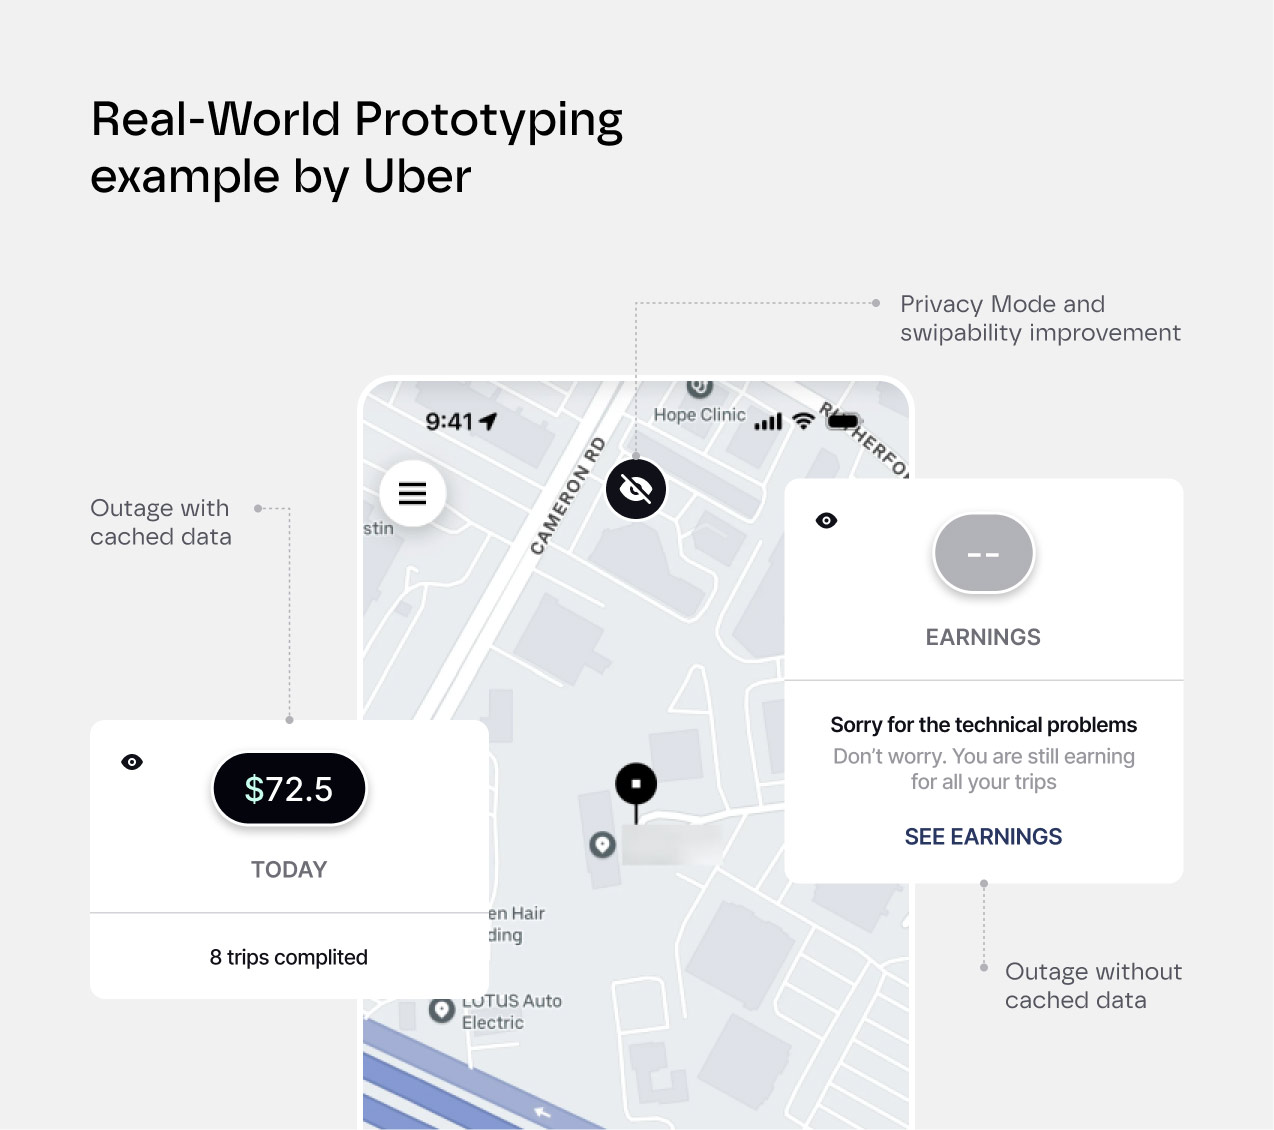
Uber's redesign of their driver app demonstrates the power of progressive prototyping perfectly.
When redesigning their driver app for use across 400+ cities in 70+ countries, Uber faced massive challenges around language, cultural symbols, and variable internet speeds. Their solution? A strategic prototyping approach that evolved with their understanding.
They started with low-fidelity prototypes in English using Sketch and InVision, then adapted these into different languages like Hindi and Chinese. This simple first step revealed critical translation issues before a single line of code was written.
As they progressed to higher-fidelity interactive prototypes, they uncovered insights no survey could reveal. In India, drivers misinterpreted the earnings bar chart icon as a network signal indicator—something the team would never have anticipated without testing. This led them to switch to a money-based icon that worked across cultures.
Tools and Efficiency Tips
Figma leads the industry with its collaborative features, other solid options include Adobe XD, Sketch with InVision, and Marvel. For quick, low-fidelity work, don't overlook the power of pen and paper.
To prototype efficiently:
- Use design systems and UI kits instead of creating elements from scratch
- Focus only on what you need to test
- Start with critical user paths before expanding to edge cases
- Set time limits to avoid perfectionism
Prototyping is iterative. Each version should incorporate learnings from the last, creating a cycle of build, test, learn, and repeat. This process is what turns promising ideas into exceptional products that truly serve user needs.
Step 5: Testing and Feedback
Your prototype may look perfect to your team, but the real test comes when you put it in front of actual users. The goal of testing isn’t validation—it’s learning what really works for your users.
Choosing Your Testing Approach
Testing comes in two main forms. Moderated testing lets you dig deeper with follow-up questions when users show signs of confusion.
Unmoderated testing helps you gather data from a wider range of users across different locations. With remote testing now common, we often see more authentic behavior since users interact from their natural environment.
Creating Effective Test Sessions
The key to valuable testing lies in how you structure the sessions:
- Frame tasks realistically: Instead of "Click the dashboard button," try "Show me how you'd check your monthly performance"
- Ask users to think out loud as they navigate
- Watch for hesitation and confusion—these moments often reveal the biggest insights
- Avoid leading users or defending design decisions
Learning from Results
After testing, organize what you observed before jumping to solutions. A simple but effective approach is plotting issues on a frequency vs. severity matrix. This helps prioritize which problems need immediate attention.
When sharing findings with stakeholders, specific examples hit harder than statistics.
Showing a video of a real user struggling with your product creates more impact than saying "70% of users failed this task."
Remember that testing isn't a one-time event—it's an ongoing practice that continues through development and beyond launch. Think of it as your product's immune system, identifying problems before they can affect the user experience. Never stop learning from your users.
After conducting tests, analyzing the insights, and several iterations it’s time to think about development.
{{another-article-component}}
Step 6: Development and Launch
This phase is where your design transforms from concept to reality—and its success depends heavily on clear communication and thorough planning.
Design Handoff
Think of the handoff between design and development as passing a baton in a relay race. Clear documentation prevents costly back-and-forth later. Focus on creating detailed design specifications with precise measurements and interaction patterns. Tools like Figma or Zeplin help generate these automatically. A live handoff meeting with developers can quickly resolve questions and ensure everyone's aligned.
Design-Development Partnership
The relationship between designers and developers shouldn't end at handoff. Regular check-ins help catch issues early and keep the final product true to its design vision. Create a shared vocabulary and stay available for quick clarifications. The best products come from teams where designers understand technical constraints and developers appreciate design goals.
And here you are. First release.
After Launch
Yet launch isn't the end—it's the beginning of learning how users actually interact with your product. Track key metrics, analyze user behavior through heat maps and session recordings, and collect feedback through support channels. Many successful products evolve significantly in their first six months based on real-world usage data.
By viewing the launch as the start of an ongoing conversation with users, you create products that truly serve their needs while delivering business value.
Essential Tools for Modern Product Design
The right tools can make or break your product design process. But with countless options available, choosing the right ones can feel overwhelming. Here's our carefully curated selection of tools that consistently deliver results.
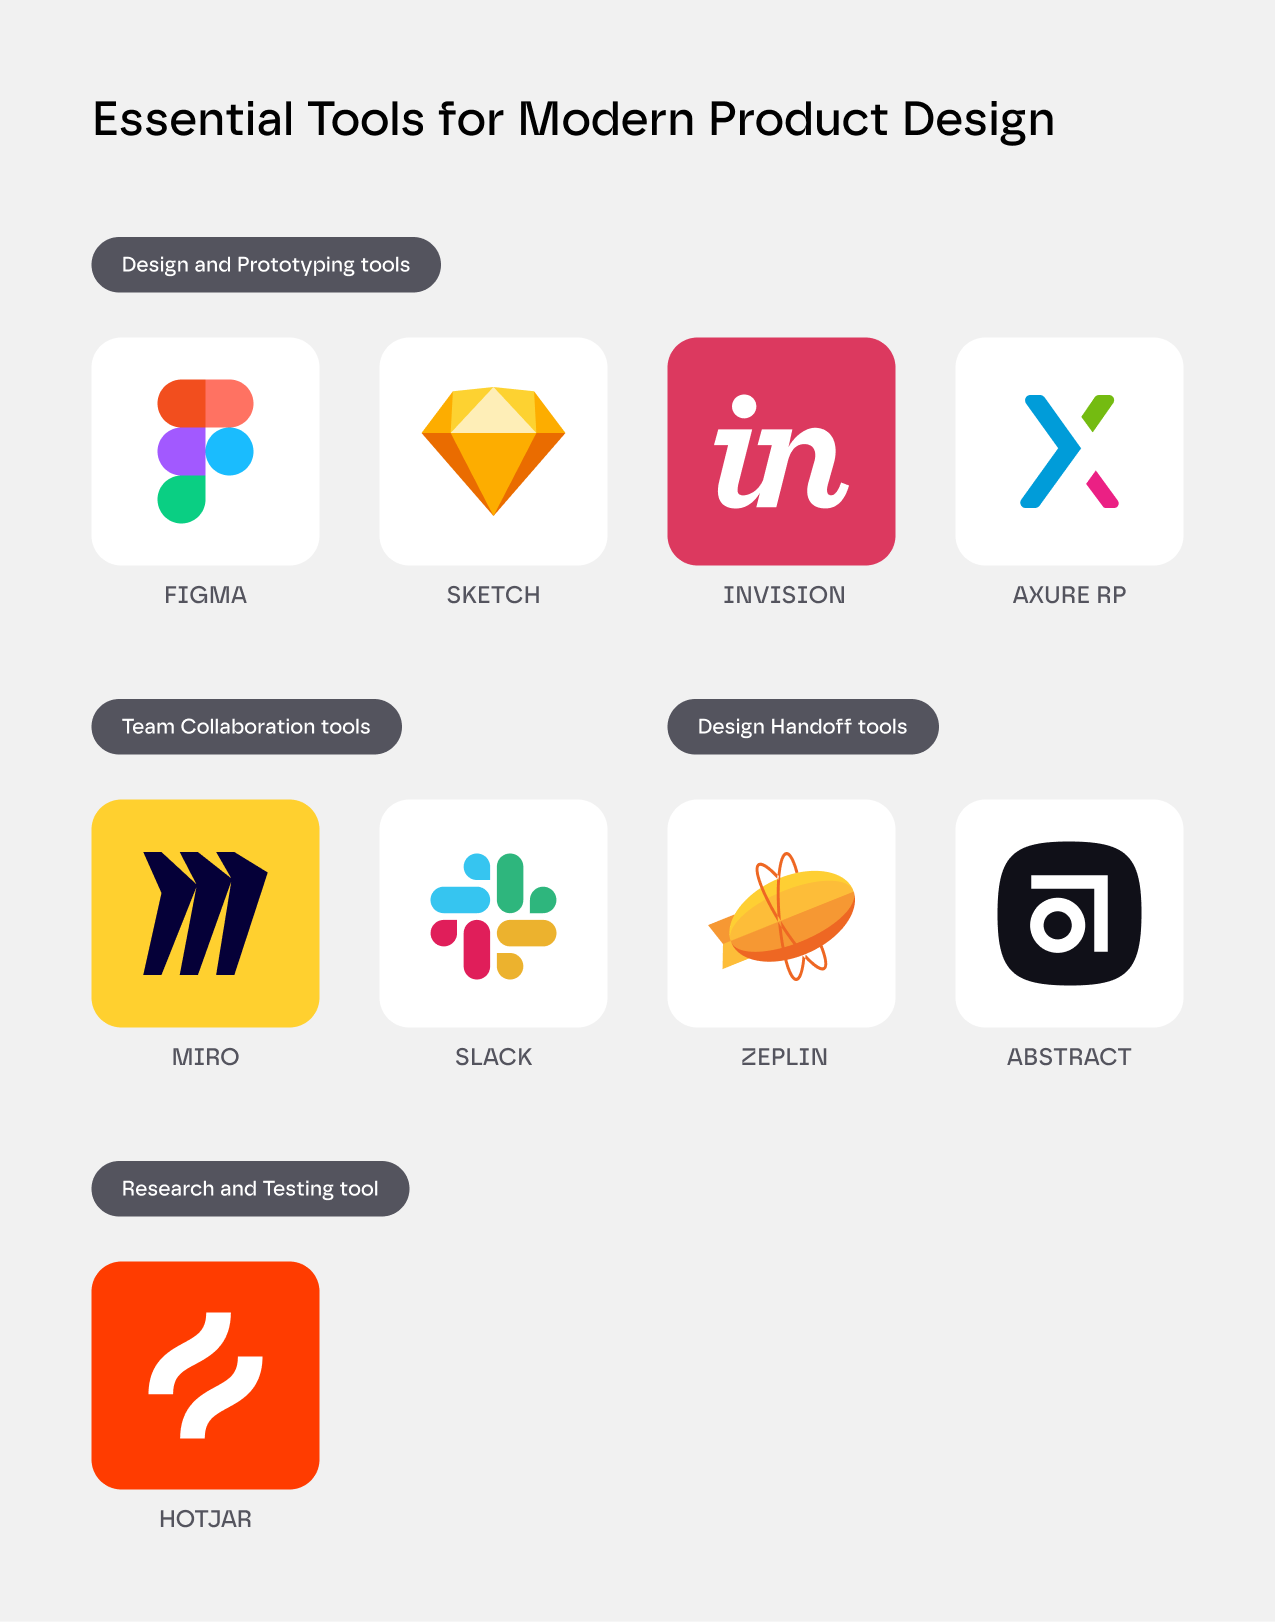
Design and Prototyping tools
Figma has become the go-to design tool for most product teams—and for good reason. Its real-time collaboration features make working with remote teams feel natural. Plus, its auto-layout and component libraries help maintain consistency across your designs without extra effort.
For those who prefer working locally, Sketch still offers a refined experience on Mac. Its extensive plugin ecosystem means you can customize your workflow exactly how you want it.
Need to create complex, interactive prototypes? InVision and Axure RP shine here. InVision is perfect for quick prototypes you can share with stakeholders. Axure RP handles more complex scenarios, especially when you need to work with dynamic data.
Research and Testing tools
UserTesting helps you gather video feedback from real users quickly. Watch how people actually use your product and hear their thought process as they navigate through it.
Hotjar adds another layer of insight with its heatmaps and session recordings. Seeing where users click, scroll, and get stuck often reveals usability issues that weren't obvious during design reviews.
Team Collaboration tools
Remote work is here to stay, and Miro has become essential for virtual collaboration. Its infinite canvas works beautifully for brainstorming sessions and design sprints. Teams can work together in real-time, just like they would in a physical space.
For day-to-day communication, Slack keeps conversations organized and searchable.
Design Handoff tools
The handoff from design to development is often where things go wrong. Zeplin helps bridge this gap by automatically generating style guides and specifications. Developers get precise measurements and CSS code, reducing back-and-forth questions and potential errors.
For larger teams working on complex products, Abstract adds version control to your design files. Track changes, branch off to explore new ideas, and merge approved designs back into the main project—just like developers do with code.
However, tools support your process, not dictate it. Start with the essentials and add more as your needs grow.
Conclusion
Product design isn't a perfect science—it's a human discipline filled with discovery, occasional setbacks, and breakthrough moments. Throughout this guide, we've walked through the steps that separate successful digital products from those that get abandoned after first use. From defining your vision to launching and iterating, each phase matters in creating experiences that users genuinely value.
Your product journey will have its unique challenges and victories. The frameworks and methods shared here aren't commandments—they're proven starting points that you'll adapt and improve for your specific context.
Exceptional products come from teams who stay humble enough to learn, brave enough to test their ideas, and committed enough to follow where user insights lead.
Ready to create something that truly matters to your users? We'd love to hear about your next project. Get in touch to explore how we can help turn your vision into reality.
{{cta-blog-component}}


![7 UX Research Methods You Need in 2025 [+ When to Use Each]](https://cdn.prod.website-files.com/6758a60f42c5a5573226dcf1/67c6e6b809bc47efde28b8e6_7%20Best%20UX%20Research%20Methods.avif)